Sunday, March 30, 2008
Thursday, March 27, 2008
Blog things
Il blog è qualcosa di molto intuitivo da usare, e non bisogna aver timore di provare. Provo a dare un pò di istruzioni per l'uso.
Scegliete la vostra lingua preferita dalle opzioni del vostro profilo - Choose your favourite language from your profile options
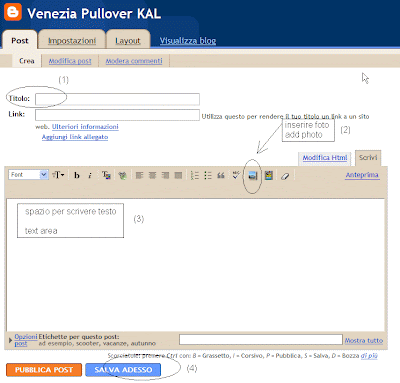
Per scrivere un nuovo messaggio selezionate "nuovo post" - to write a new message click on "new post"

Ora inserite you can fill in:
(1) titolo title
(2) tasto per aggiungere una o più foto button to add one or more photos
(3) testo del messaggio text of your message
(4) tasto blu per salvare il messaggio senza pubblicarlo blue button to save message without publishing tasto arancione per pubblicare orange button to publish
Sometimes message editing can be nasty, don't give up!
To blog is easier than you can imagine, don't be afraid to try. I give you here a few hints.
Prima di tutto accedete al vostro account blogger cliccando su entra in alto a sinistra e scrivendo e-mail e password.
First of all enter your blogger account by clicking enter=entra on top-right of your screen and writing your e-mail and password.
Scegliete la vostra lingua preferita dalle opzioni del vostro profilo - Choose your favourite language from your profile options
Per scrivere un nuovo messaggio selezionate "nuovo post" - to write a new message click on "new post"
Ora inserite you can fill in:
(1) titolo title
(2) tasto per aggiungere una o più foto button to add one or more photos
(3) testo del messaggio text of your message
(4) tasto blu per salvare il messaggio senza pubblicarlo blue button to save message without publishing tasto arancione per pubblicare orange button to publish
Per caricare le foto to upload photos:
(2.1) se le foto sono archiviate sul vostro computer cliccare "sfoglia" per cercarle, se le foto sono già state caricate in rete su Flickr-Picasa-.... si può in alternativa richiamarle direttamente scrivendo il loro URL If you host photos on your computer choose "browse" to find them, if you have photos uploaded with Flickr-Picasa-etc... you can alternatively address directly to their URL.
(2.2) Scegliete anche la dimensione della foto e la sua posizione, poi cliccate su carica immagine choose photo size and position, then click on upload image
(2.3) Aspettate un pò per il caricamento, poi schiacciate su "completato" After a while upload is complete and you can click on "done"
Sometimes message editing can be nasty, don't give up!
Wednesday, March 19, 2008
Ancora io!
Eccomi qui, la strega del fair isle! Mi davate per dispersa, eh! Invece io a capo chino procedevo con la costanza di un mulo sulla strada stretta e tortuosa che porta alla vetta!Mi manca ancora un pezzo, ma ormai la salita è finita! Le maniche sono pronte!
Devo dichiarare ufficialmente quello che ho sempre pensato di fare … oso modificare il modello a mio piacere! Il prossimo passo sarà fare una bella scollatura e le maniche raglan, e che Eunny Jang mi perdoni!
Impegnandomi come sempre a documentare i progressi anche con note tecniche, vi fornisco una serie di link molto utili per imparare a lavorare in tondo con due circolari invece che con il gioco di ferri a cinque punte.
Per le maniche la tecnica dei due circolari si è rivelata molto veloce …. almeno per me, che non sono una “calzinista” !!!!
knitting help - advanced techniques
lavorazione in tondo con due circolari : video - spiegazioni (solo in inglese, purtroppo!)
Here I am, your fair isle witch! You thought I was lost, did you! No, I was stubbornly proceeding like a mule up along the narrow and winding road that leads to the top!
There’s a further short distance to go, but the steep slope is behind me! Sleeves are ready!
Now I have to confess what was in my mind from the beginning … to adapt the pattern to my taste! I'm going to make a wide neckline and raglan sleeves, and may Eunny Jang forgive me!
Since I used to add techical notes at every step of this project, now I’ll give you a list of useful links to learn how to work in the round with two circular needles instead of DPNs.
Working in the round with two circulars was a very fast technique to speed up my knitting …. I’m not a sock-knitter!!!!!
Sunday, February 24, 2008
Incontentabile!
Ditelo pure, tanto lo so già ... sono incontentabile!

E' solo un problema di tensione! It's only a matter of gauge!
Questo bordo inferiore così slabbrato non mi piaceva proprio, forse sarebbe bastato un deciso colpo di ferro per ridurlo all'obbedienza, però aveva uno spessore ed una rigidezza molto diversa rispetto al corpo del pullover col disegno fair isle!
Yes I know ... I'm hard to please!
I really didn't like this lower edge hem, it was so flaring ... maybe I could have commanded obedience through strong ironing, but the hem was so different in thickness and stiffness if compared with the fair isle body of the sweater!
E allora? Via, l'ho sfilato! Con un pò di fatica ho riprenso i punti lavorando un nuovo bordo nel classico stile a coste bicolori dei maglioni Fair Isle. Così va bene .... ha lo stesso spessore del pullover!
Well then, I frogged it! I labouriously picked up the stitches and I knitted a new hem working colored ribbing in the round according to the traditional fair isle patterns! This is working properly ... thickness is exactly the same as the pullover!

Quest'ultima foto mostra solo la differente larghezza del bordo manica , eseguito sullo stesso numero di punti e con lo stesso diametro di ferri, nelle due diverse tecniche.
In this photo you can notice the different width of two sleeve hems, on the same number of stitches and same needles. The first is knitted following the pattern, the second according to the
traditional colored ribbing technique.
E' solo un problema di tensione! It's only a matter of gauge!Wednesday, February 20, 2008
finalmente ho iniziato

Ecco l´inizio del mio Venezia!!
Finally I started my Venezia!!
Ho avuto un pò di problemi iniziali con il gauge, dovevo scegliere due misure più piccole per starci..avendo un gauge di 27 maglie/10 cm invece dei 31....
Non mi piaceva il bordo che diventava troppo largo e ho deciso di fare un semplive ribbing aumentando poi di 12 maglie per raggiungere la misura giusta per il mio gauge.
I had some initial problems with my gauge it is too big, 27 stitches in 4 inches instead of 31...
I didn' t like the hem , it was too large so I decided to make a simple rib hem and increased afterwards with 12 stitches to get the next size.
Adesso si dovrebbe solo trovare il tempo per finire veloce questo meraviglioso sweater che è veramente affascinante e divertente.
Now the only problem is to have enough time to finish his fantastic and addicting sweater!
Tuesday, February 12, 2008
My Venezia Swatch
Hello All!
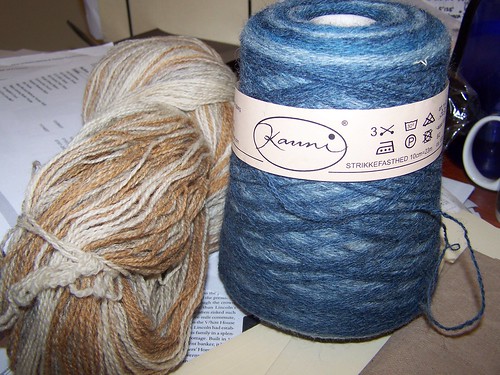
I'm Jen and I'm doing something a little different for my Venezia. I opted to knit with two colors of Kauni Effektgarn in blues and beiges. I'm already enjoying this pattern so much that eventually I may convince myself to knit the multi-color version as well.

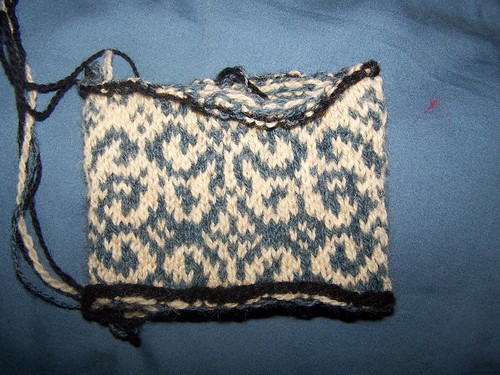
Here's my swatch:

The bottom of the swatch uses blue as the background and white as the figure. The top of the swatch has white as the background and blue as the figure. Can you tell the difference?
It was really hard to decide which I liked better, but I opted to use the blue background and white figure. I'm also using black for the hem and neck trim. Now I just need to find something I can use this swatch for. It's too pretty to sit around doing nothing. :)
I'm Jen and I'm doing something a little different for my Venezia. I opted to knit with two colors of Kauni Effektgarn in blues and beiges. I'm already enjoying this pattern so much that eventually I may convince myself to knit the multi-color version as well.

Here's my swatch:

The bottom of the swatch uses blue as the background and white as the figure. The top of the swatch has white as the background and blue as the figure. Can you tell the difference?
It was really hard to decide which I liked better, but I opted to use the blue background and white figure. I'm also using black for the hem and neck trim. Now I just need to find something I can use this swatch for. It's too pretty to sit around doing nothing. :)
Sunday, February 3, 2008
Progressi
Ecco il mio lavoro, sera dopo sera è cresciuto fin quasi allo scalfo...qua e là ci sono piccole pecche, ma non sono evidenti e mi sono rifiutata to sfilare per recuperarle. Sono molto soddisfatta della pulizia del lavoro sul rovescio... pochi fili da tessere solo per le fasce iniziali, eseguite quando ancora non usavo il metodo split-splicing.
Che soddisfazione non essermi "persa" tra i colori e le ripetizioni del disegno, ed aver inoltre acquisito una buona velocità di esecuzione!
La tecnica di base consiste nel lavorare due colori alla volta per 3-5 giri e poi sostituirli con altri. Mentre la mano destra si occupa dello sfondo, guidando e lavorando il colore di background, la mano sinistra tiene il colore chiaro e disegna punto dopo punto gli arabeschi. I due fili non si intrecciano mai sul dietro del lavoro e le maglie eseguite nello stesso colore non distano mai orizzontalmente più di 5 punti tra loro.
Ho imparato ad usare entrambe le mani per lavorare il diritto seguendo questi video che illustrano due tecniche:
English method per la mano destra
Continental method per la mano sinistra.
La maglia stile Fair Isle richiede l'esecuzione "in tondo" di tutti i pezzi che formano il capo, sia usando i ferri circolari che il gioco di ferri a due punte. Si lavora sempre a diritto e dopo i primi ferri (che sono i più problematici!) il motivo che via via si va componendo serve da guida e permette di fare un pò a meno dello schema di riferimento.
A proposito di schema e di ripetizioni....
1) Ho copiato il disegno in bianco e nero su una griglia a quadretti.
2) Ho marcato sul disegno un'altra griglia di riferimento a riquadri più grandi da 5x5.
3) Come promemoria per i colori da usare ho aggiunto a lato dello schema due colonne, a sinistra i colori degli arabeschi (per la mano sinistra) , a destra (per la mano corrispondente) i colori dello sfondo.
4) Sul lavoro ho piazzato una serie di "marcapunti", di anellini che segnano la posizione dell'inizio del giro in corrispondenza di un fianco, e di tutti i punti salienti in cui si deve ripetere lo schema del disegno. Si possono trovare in vendita dei ciondolini molto graziosi, ma per lo scopo vanno benissimo dei comuni anellini di metallo o plastica, in vendita nelle mercerie per fissare le spalline dei reggiseni! Ho usato due marcapunti diversi dagli altri per segnare la posizione dei fianchi, dove è necessario eseguire le diminuzioni e gli aumenti per sagomare il pullover.
Questo è tutto! Forse è troppo! Comunque non mi sono persa... e sono arrivata fin qui! Credo che ora mi dedicherò un po' alle maniche....
This is my work in progress, I knitted evening after evening a few rounds and now it reaches the underarm. Every now and then I made mistakes, but they aren't so evident, and I refused to frog my work to knit it again. I'm very pleased because the wrong side of my work looks so clean... only a few ends to weave in for the first color bands because I didn't use the split-splicing method yet!
To my great satisfaction I didn't get "lost" among colors and pattern repeats, moreover now I'm knitting faster.
The elements of this technique are knitting with two colors at a time, and changing them after 3-5- rounds. The right hand deals with background, it guides and knits the background yarn, whereas the left one works in pattern color and draws arabesques stitch by stitch. The two threads are never twisted on wrong side of work, and stitches in the same color are never more than 5 stitches far from each other.
I learned how to use both hands to knit by watching videos showing the techniques:
Fair isle knitting calls for working in the round every piece of your garment, either on circular needles or dpn's. You'll always have to knit on right side of work and, past the first rounds (the most difficult ones!) you will be gradually making up the motif and this will be your guide so you won't have to look at the scheme so often as at the beginning of your work.
As for scheme and pattern repeats....
1) I copied the motif in white and black on a squared grid.
2) I marked some lines to divide the pattern into bigger squares 5x5.
3) I added two columns to remember which color should be carried every round by left and right hand.
4) I placed some stitch markers along the work to mark the beginning of round at one side and the starting point of each pattern repeat. You can find some very precious stitch markers but actually everything you need are some small metal or plastic rings. You can buy from every haberdasher's the rings used to fix bra shoulder straps! I used two different markes at side stitches to remember the point where I had to make decreases and increases to shape pullover sides.
That's all! Maybe too much! But I didn't get lost.... and I knitted so far! I'm going to focus on the sleeves now...
Subscribe to:
Posts (Atom)